Having spent a fair bit of time lately setting up new servers and installing LAMP stacks, I figured I’d write a tutorial on the basic process I use. And while there are plenty of tutorials covering the installation of the LAMP stack on Ubuntu, there aren’t many I could find which ensure that latest versions of each component are installed.
Therefore, this tutorial will run you through several fundamental things that should be done to set up any Ubuntu server, such as user creation, SSH configuration, and firewall setup. Following that, it’ll take you through installing the latest versions of Apache, MySQL, and PHP. At the time of writing, these versions are 2.4.37, 8.0.13, and 7.2.13 (discounting the very recent 7.3.0), respectively.
The Ubuntu version used is 18.04, its latest long term service (LTS) release. While the setup may (and probably will) work on previous releases, I recommend you stick with 18.04, at least until 20.04, the next LTS release, to ensure updates for your server last longer than six months.
User Creation
Begin with a freshly installed server and log into it as root, using whatever means available to you. Usually your host will provide you with a root password upon server creation. If not, then most hosts should offer direct access to the console via their web service.
Once logged in, the first step we’ll take is to create a new user. We don’t want to allow remote root login, due to it being the all-powerful account common to essentially all Linux servers.
$ adduser new_user
Adding user `new_user' ...
Adding new group `new_user' (1000) ...
Adding new user `new_user' (1000) with group `new_user' ...
Creating home directory `/home/new_user' ...
Copying files from `/etc/skel' ...
New password:
Retype new password:
passwd: password updated successfully
Changing the user information for new_user
Enter the new value, or press ENTER for the default
        Full Name []:
        Room Number []:
        Work Phone []:
        Home Phone []:
        Other []:
Is the information correct? [Y/n] Y
Enter and confirm your chosen password. Obviously, make sure it’s something strong, especially if you intend on allowing SSH access via passwords. The personal information it asks for isn’t necessary, so you can leave it blank or fill it as you wish.
Now you need to give this user sudo powers (ability to act as root). We’re also going to switch to this user, which will come in handy later when setting up SSH keys.
$ usermod -a -G sudo new_user
$ su - new_user
Apt Repositories
Keeping software up-to-date is one of several tenets of security, thus in this section we’ll make sure all system packages are running the latest available version.
As described earlier, we also want our LAMP stack to be up-to-date when we install it. Unfortunately, Ubuntu’s default apt repositories often lag behind releases a bit, so we’ll be adding new ones which contain up-to-date versions.
For Apache and PHP this is traditionally provided by Ondřej Surý’s PPAs:
$ sudo add-apt-repository ppa:ondrej/apache2
$ sudo add-apt-repository ppa:ondrej/php
Simply press enter when prompted to add them.
For MySQL, this is provided by their own Debian package file. You can find out what their latest package file is, and download it, at their apt repository page. At the time of writing it is mysql-apt-config_0.8.11-1_all.deb. We’ll use wget to download the file and dpkg to add it:
$ wget https://dev.mysql.com/get/mysql-apt-config_0.8.11-1_all.deb
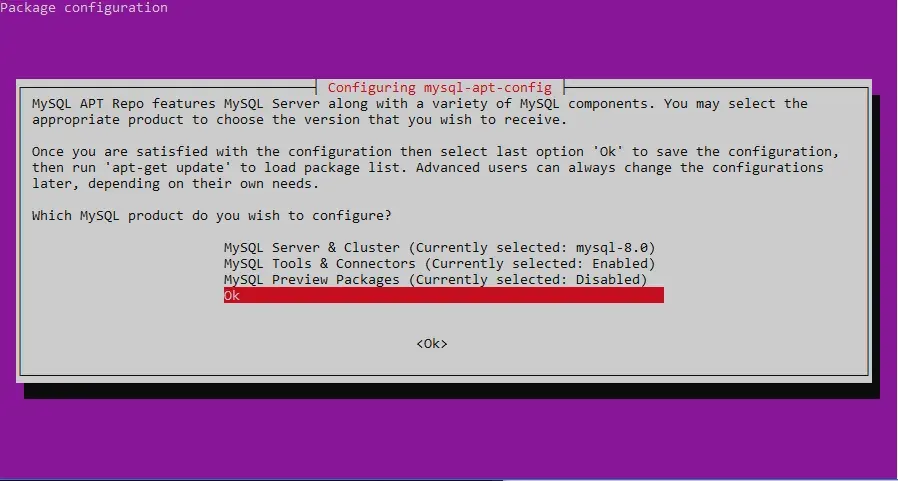
$ sudo dpkg -i mysql-apt-config_0.8.11-1_all.debA screen like the one below will display, giving you options to decide which reposititories to install. It should be set up correctly by default, but ensure mysql-8.0 (or whatever is latest) is selected using enter and the up/down arrows. Then, select OK and press enter.
Finally, clean up by removing the package file:
$ rm mysql-apt-config_0.8.11-1_all.debWith this done, we can update the package lists and upgrade the server’s software:
$ sudo apt update
$ sudo apt upgrade
You will likely have a good deal of updates to download; in my case it was over 330 MB. Press Y then enter to let it continue the installation. Once this is done, remove packages which are no longer needed with:
$ sudo apt auto-removeSSH
For the purposes of this guide, I’ll assume you already have an SSH key. If not, there are plenty of guides on the internet regarding how to generate one.
As the user we previously created, we’ll make the .ssh folder and edit a new authorized_keys file. This instructs the SSH service what keys can be used to access the user’s account.
$ cd
$ mkdir -p .ssh
$ nano .ssh/authorized_keys
Paste in your public SSH keys. To save, press Ctrl+X, Y, then Enter. Note: if you’re using the Linux for Windows subsystem like me, you may need to right-click to paste.
Then, to properly secure these files, enter the command below:
$ chmod -R 700 .sshYou should now be able to access this user directly via SSH.
Now we need to secure the SSH service itself. Let’s create a backup of the config file, then open up the original:
$ sudo cp /etc/ssh/sshd_config /etc/ssh/sshd_config.backup
$ sudo nano /etc/ssh/sshd_config
Change the following fields to the values shown below. Some may be commented out, if so uncomment them. To make finding them easier, press Ctrl+W, type them in, and press enter.
PermitRootLogin no
X11Forwarding no
IgnoreRhosts yes
PermitEmptyPasswords no
Explaining them in order:
- Disallow remote root login, as mentioned previously.
- Disable X11 forwarding: this allows remote GUI control, which a server almost certainly has no need for.
- Disable .rhosts files: a classic vulnerability disabled by default, but it’s good practice to specify this explicitly.
- Don’t permit empty passwords: speaks for itself.
I would also recommend disabling password authentication and relying only on SSH keys. This makes a bruteforce attack on your password impossible. For this, modify a further two fields:
PasswordAuthentication no
UsePAM no
This disables password authentication and PAM, an authentication module which is no longer needed now that we’re only using keys.
Reload the SSH service to apply the new config:
$ sudo systemctl reload sshAt this point, you may want to check the status of the SSH service:
$ sudo systemctl status ssh
  ssh.service - OpenBSD Secure Shell server
   Loaded: loaded (/lib/systemd/system/ssh.service; enabled; vendor preset: enabled)
   Active: active (running) since Sat 2019-01-12 00:56:20 UTC; 2h 49min ago
You may need to press q to exit the status command. If the service isn’t active as seen above, look at the log displayed below the process information. It may give a clue about what went wrong. If it is active, test it by exiting and logging back in. If you can’t log back in, you’ll likely need to log into root via your host’s console access and restore the backup config. Then, add one modification in at a time, testing the service as you go.
Firewall
The final rudimentary step to securing the server is to setup the firewall. This’ll be handled by ufw, which your system should already have. If not, you can install it with sudo apt install ufw.
We want to allow only the necessary ports in and, in most cases, all ports out, which is the default. All your basic web server needs is SSH, HTTP, HTTPS, or, by default, ports 22, 80, and 443. The following commands set up this configuration and enable the firewall:
$ sudo ufw allow ssh
$ sudo ufw allow http
$ sudo ufw allow https
$ sudo ufw enable
Command may disrupt existing ssh connections. Proceed with operation (y|n)? y
Firewall is active and enabled on system startup
Check on the status of your firewall with:
$ sudo ufw status verbose
Status: active
Logging: on (low)
Default: deny (incoming), allow (outgoing), disabled (routed)
New profiles: skip

To                         Action      From
--                         ------      ----
22/tcp                     ALLOW IN    Anywhere
80/tcp                     ALLOW IN    Anywhere
443/tcp                    ALLOW IN    Anywhere
22/tcp (v6)                ALLOW IN    Anywhere (v6)
80/tcp (v6)                ALLOW IN    Anywhere (v6)
443/tcp (v6)               ALLOW IN    Anywhere (v6)
Apache
To install Apache 2, execute the following and again, press Y then enter to confirm.
$ sudo apt install apache2After this is installed, navigate to your server’s IP address in your browser. You should see a page like the following:

If so, the server is up and running.
At this point, depending on your needs, you’ll likely want to configure a few things about the server.
Since you’re installing the LAMP stack, you’ll want to make index.php your default directory index:
$ sudo nano /etc/apache2/mods-enabled/dir.confChange the text after DirectoryIndex to index.php index.html index.xhtml index.htm. You don’t have to cut all the other file types out, though PHP and HTML are likely the only index files you’ll really use out of the provided ones.
If you want to allow .htaccess files and/or change where your web files are served from:
$ sudo nano /etc/apache2/apache2.confFind the following:
<Directory /var/www/>
        Options Indexes FollowSymLinks
        AllowOverride None
        Require all granted
</Directory>
And change AllowOverride None to AllowOverride All.
If you want to change where the files are hosted, change /var/www to the folder path (/srv, or a subfolder of it, is a common choice). Then change DocumentRoot to the same path in /etc/apache2/sites-available/000-default.conf.
A common problem with new servers I’ve run into is not having mod_rewrite enabled, thus breaking most of my .htaccess files. If this applies to you, simply run
$ sudo a2enmod rewriteFinally, to implement any changes made:
$ sudo systemctl restart apache2MySQL
Next we’ll install MySQL:
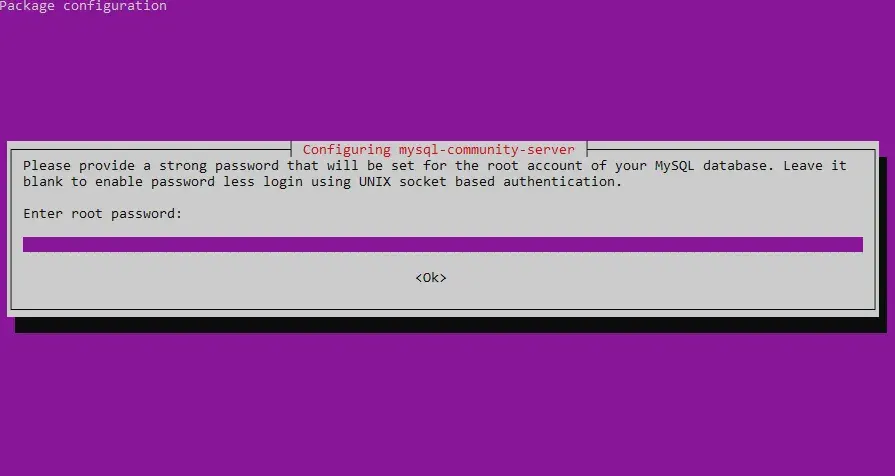
$ sudo apt install mysql-serverDuring installation a prompt screen will appear, such as the one below, asking for a root password. As always, make sure it’s something strong. You’ll then be prompted to confirm the same password.
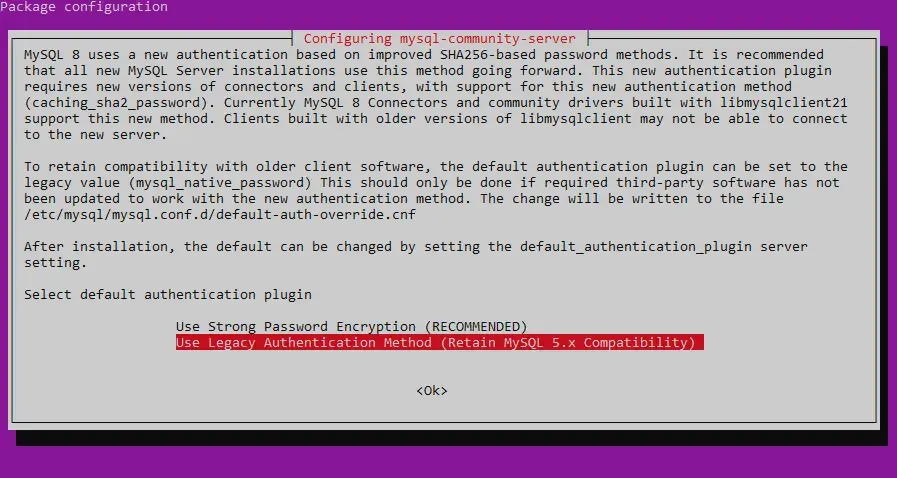
Following this, you’ll be be given the option to use MySQL 8’s new and improved authentication method. At the time of writing, phpmyadmin and PHP 7.2 don’t appear to have support for this new method, thus, while it would be nice to make use of it, you may want to select Legacy Authentication Method unless software has updated by the time you read this or you’re confident you can make it work.
With MySQL installed, it’s time to secure its installation, which by default isn’t as secure as you might like. A provided script takes care of this:
$ sudo mysql_secure_installationYou’ll be prompted for the root password you just set. What follows is a series of yes or no questions. Take care, since any key other than y or Y is counted as a no.
The first is a password validator, which ensures users have reasonably strong passwords. I’d consider this optional if you are the only one creating MySQL users, but it’s not a bad thing to have either way. If you do choose yes, you’ll be given an option of how tight you want it to be:
There are three levels of password validation policy:

LOW    Length >= 8
MEDIUM Length >= 8, numeric, mixed case, and special characters
STRONG Length >= 8, numeric, mixed case, special characters and dictionary file

Please enter 0 = LOW, 1 = MEDIUM and 2 = STRONG:
The next option is whether to to change the root user’s password. Assuming you set a strong password just a minute ago, this shouldn’t be necessary.
I’d recommend saying yes to all of the options that follow. Anonymous users, remote root login, and MySQL’s test database are all things you don’t want, and there’s no reason not to immediately enact altered privileges.
PHP
To install PHP:
$ sudo apt install php libapache2-mod-php php-mysql php-mbstringYou don’t strictly need php-mbstring, though phpMyAdmin does require it. Add on to this list any other PHP extensions you might require.
To test your PHP installation:
$ sudo nano /var/www/html/index.php # or whatever your web host path isType <?php phpinfo(); and save the file. Navigate to your server’s IP in your browser and you should see a page listing a plethora of information about your installation.
I’d recommend deleting this file after you’re done with it, as leaving it there is a vulnerability.
Conlusion
Assuming all went well, you now have an up-to-date Ubuntu LAMP stack. If you want to see all the shell commands in one place, I created a shell script based on the tutorial. Though you probably could, don’t run it all at once.
From here the next step is often to install phpMyAdmin. Unfortunately, at least in my experience, installing the version available from Ubuntu’s apt repositories doesn’t go well under MySQL 8, thus a manual installation may be the only option. I’ve written a tutorial on this process for those interested.